
GitHub Pages Post - Markdown File Template 01
About this template file:
This is a Markdown template file for GitHub Pages.
A suggested way to use this file:
- Search for the function you want.
- Copy and Paste the code you want to your Markdown file
- Fine-tuning the code to the style you like.
Enjoy! ^_^
1. Section heading (1st-level heading)
Markdown supports two styles of headers, setext and atx.
Setext-style headers are “underlined” using equal signs (for 1st-level headers) and dashes (for 2nd-level headers). For example:
1.1 Setext-style heading
Any number of underlining =’s or -’s will work.
Syntax:
This is an H1
=============

This is an H2
-------------
1.2 Atx-style heading
There are 6 levels of atx-style headings in Markdown as shown in this section.
Syntax:
# 1. Section heading (1st-level heading)
## 1.1 Subsection heading (2nd-level heading)
### 1.1.1 Subsubsection heading (3rd-level heading)
#### 1.1.1.1 4th-level heading
##### 1.1.1.1.1 5th-level heading
###### 1.1.1.1.1.1 6th-level heading
1.2.1 Subsubsection heading (3rd-level heading)
Normal text.
1.2.1.1 4th-level heading
Normal text.
1.2.1.1.1 5th-level heading
Normal text.
1.2.1.1.1.1 6th-level heading
Normal text.
2. Text styles
2.1 Markdown supported text syntax
2.1.1 For italic text
Syntax:
*Italic text*
_Italic text_
Result:
Italic text
Italic text
2.1.2 For bold text
Syntax:
**Bold text**
__Bold text__
Result:
Bold text
Bold text
2.1.3 For italic bold text
Syntax:
***Italic bold text***
___Italic bold text___
Result:
Italic bold text
Italic bold text
2.1.4 For delete (strikethrough) text
Syntax:
~~Delete text~~
Result:
Delete text
2.2 underline text (HTML syntax)
Markdown doesn’t support underline text.
However, we can reach the goal by HTML syntax.
Syntax:
<u>Underline text</u>
Result:
Underline text
2.3 Quote text
Markdown uses e-mail conventions for quoting blocks of text.
A block quotation is one or more paragraphs or other block elements (e.g., lists or headers), with each line preceded by a > character and a space.
Syntax:
> Text that is a quote.
Result:
Text that is a quote.
Syntax:
> Hello, World!
>
> Have a nice day!
>
> Hsien-Ching Chung
Result:
Hello, World!
Have a nice day!
Hsien-Ching Chung
Nested quote:
Syntax:
> Hello, World!
>
> > Have a nice day!
> >
> > Hsien-Ching Chung
Result:
Hello, World!
Have a nice day!
Hsien-Ching Chung
Syntax:
> Hello, World!
>
>> Have a nice day!
>>
>> Hsien-Ching Chung
Result:
Hello, World!
Have a nice day!
Hsien-Ching Chung
2.4 Code text
To indicate a span of code, wrap it with backtick quotes (`).
Syntax:
Use the `read()` function.
Result:
Use the read() function.
To include a literal backtick character within a code span.
Syntax:
``There is a literal backtick (`) here.``
Result:
There is a literal backtick (`) here.
The backtick delimiters surrounding a code span may include spaces.
Syntax:
A single backtick in a code span: `` ` ``

A backtick-delimited string in a code span: `` `foo` ``
Result:
A single backtick in a code span: `
A backtick-delimited string in a code span: `foo`
More detailed syntax about backtick (`) can be found in the link.
https://stackoverflow.com/questions/55586867/how-to-put-in-markdown-an-inline-code-block-that-only-contains-a-backtick-char
2.5 Color text
Markdown doesn’t support color. We can use inline HTML inside Markdown to reach this goal.
Syntax:
<span style="color:red">some *red* text</span>
<span style="color:green">some *green* text</span>
<span style="color:blue">some *blue* text</span>
Result:
some red text
some green text
some blue text
2.6 Highlight text
This isn’t common, but some Markdown processors allow you to highlight text. To highlight words, use two equal signs (==) before and after the words.
Syntax:
I need to highlight these ==very important words==.
Result:
I need to highlight these ==very important words==.
NOTE: If we still see (==) around the highlight text, it means that the Markdown processors don’t support the syntax.
Or we can use HTML syntax to highlight text.
Syntax:
I need to highlight these <mark>very important words</mark>.
Result:
I need to highlight these very important words.
2.7 Superscript text
This isn’t common, but some Markdown processors allow you to use superscript to position one or more characters slightly above the normal line of type. To create a superscript, use one caret symbol (^) before and after the characters.
Syntax:
X^2^
Result:
X^2^
NOTE: If we still see (^) around the highlight text, it means that the Markdown processors don’t support the syntax.
Or we can use HTML syntax to superscript text.
Syntax:
X<sup>2</sup>
Result:
X2
Or we can use $LaTeX$ syntax to superscript text.
Syntax:
X$^2$
Result:
X$^2$
2.8 Subscript text
This isn’t common, but some Markdown processors allow you to use subscript to position one or more characters slightly above the normal line of type. To create a subscript, use one tilde symbol (~) before and after the characters.
Syntax:
X~2~
Result:
X~2~
NOTE: If we still see tildes (~) around the highlight text, it means that the Markdown processors don’t support the syntax.
Or we can use HTML syntax to subscript text.
Syntax:
X<sub>2</sub>
Result:
X2
Or we can use $LaTeX$ syntax to subscript text.
Syntax:
X$_2$
Result:
X$_2$
3. List
3.1 Bullet lists
Use *, +, or - to build bullet list.
* Item 1
* Item 2
* Item 3

+ Item 1
+ Item 2
+ Item 3

- Item 1
- Item 2
- Item 3

* Item 1
+ Item 2
- Item 3
The result is
- Item 1
- Item 2
-
Item 3
- Item 1
- Item 2
-
Item 3
- Item 1
- Item 2
-
Item 3
- Item 1
- Item 2
- Item 3
3.2 Numbered lists
Use 1. to build numbered list.
Syntax:
1. Item
2. Item
3. Item

1. Item
1. Item
1. Item


1. Item
9. Item
7. Item

Enter a sentence to terminate the continuing number.

1. Item
9. Item
7. Item
Result:
- Item
- Item
-
Item
- Item
- Item
-
Item
- Item
- Item
- Item
Enter a sentence to terminate the continuing number.
- Item
- Item
- Item
3.3 Nested lists
The bullet and numbered lists can be nested.
Syntax:
1. Item
    - aaa
    - bbb
    - ccc
2. Item
    - ddd
    - eee
Result:
- Item
- aaa
- bbb
- ccc
- Item
- ddd
- eee
3.4 Task lists
Use [ ] to build check box. To mark a task as complete, use [x].
Syntax:
- [x] Task 1
- [ ] Task 2
- [ ] Task 3
Result:
- Task 1
- Task 2
- Task 3
4. Code blocks
4.1 Pre-formatted code blocks (indentation version)
To produce a code block in Markdown, simply indent every line of the block by at least 4 spaces or 1 tab. A code block continues until it reaches a line that is not indented (or the end of the article).
Syntax:
This is a code block.
Result:
This is a code block.
One level of indentation (i.e., 4 spaces or 1 tab) is removed from each line of the code block.
Syntax:
    This is a code block level 1.
        This is a code block level 2.
    This is a code block level 1.
        This is a code block level 2.
Result:
This is a code block level 1.
    This is a code block level 2.
This is a code block level 1.
    This is a code block level 2.
NOTE: Regular Markdown syntax is not processed within code blocks, e.g., asterisks (*) are just literal asterisks within a code block. This means it’s also easy to use Markdown to write about Markdown’s own syntax.
Pre-formatted code blocks (fenced code blocks version)
To create a pre-formatted code block, wrap the code with three backticks (```) or three tildes (~~~). It also called “fenced code blocks.”
Syntax:
```
This is a code block.
```
Result:
console.log('Hello world');
Syntax:
~~~
This is a code block.
~~~
Result:
console.log('Hello world');
4.2 Syntax highlighting in fenced code blocks
Optionally, a language can be specified for a code block to enable syntax highlighting.
This can be done by appending the specified language to the starting three backticks (```) or three tildes (~~~).
Syntax:
```[specified language]
This is a code block.
```
Syntax:
```javascript
console.log('Hello world');
```
Result:
console.log('Hello world');
Syntax:
~~~javascript
console.log('Hello world');
~~~
Result:
console.log('Hello world');
REF: markdown_supported_languages
5. Hyperlinks
Markdown supports two style of links: inline and reference.
5.1 Inline-style links
5.1.1 Use “automatic” links syntax < and >
Markdown supports a shortcut style for creating “automatic” links for URLs and e-mail addresses.
Use angle brackets < and > to enclose the URL or e-mail address.
Syntax:
Link: <https://hsienching.github.io/>
Result:
Link: https://hsienching.github.io/
5.1.2 Use syntax [Alt name](<URL> "Title")
Use the syntax [Alt name](<URL> "Title") to show links.
Syntax:
This is [My GitHub Pages](<https://hsienching.github.io/> "Title") inline link.

[This link](<https://hsienching.github.io/>) has no title attribute.
Result:
This is My GitHub Pages inline link.
This link has no title attribute.
5.2 Reference-style links
Syntax:
Check out the [Jekyll docs][jekyll-docs] for more info on how to get the most out of Jekyll.
File all bugs/feature requests at [Jekyll’s GitHub repo][jekyll-gh].
If you have questions, you can ask them on [Jekyll Talk][jekyll-talk].

[jekyll-docs]: https://jekyllrb.com/docs/home
[jekyll-gh]:   https://github.com/jekyll/jekyll
[jekyll-talk]: https://talk.jekyllrb.com/
Result:
Check out the Jekyll docs for more info on how to get the most out of Jekyll. File all bugs/feature requests at Jekyll’s GitHub repo. If you have questions, you can ask them on Jekyll Talk.
6. Figures
Markdown uses an figure syntax that is intended to resemble the syntax for links, allowing for two styles: inline and reference.
6.1 Inline-style figure syntax
Syntax:


6.1.1 Bitmap figures - Normal input syntax
Supported file format: PNG, JPG, WebP (tested.)
The resolution of the original figure is 2,400 × 1,600 pixels.
(Source file: https://commons.wikimedia.org/wiki/File:Classical_Guitar_labelled_english.jpg)
Syntax:

Result:
The figure fit the column width.

6.1.2 Bitmap figures - Change figure size
Change figure size to 50%.
Syntax:
{:height="50%" width="50%"}
Result:
NOTE: GitHub doesn’t support this syntax.
6.1.3 Vector figures - Normal input syntax
Supported file format: SVG (tested.)
Jekyll support SVG file (vector figure) rendering.
(Source file: https://commons.wikimedia.org/wiki/File:Earth_poster.svg)
Syntax:

Result:
The figure fit the column width.

6.1.4 Vector figures - Change figure size
Change figure size to 50%.
Syntax:
{:height="50%" width="50%"}
Result:
NOTE: GitHub doesn’t support this syntax.
6.2 Reference-style figure syntax
Syntax:
![Alt text][id]

[id]: url/to/figure  "Optional title attribute"
Where id is the name of a defined figure reference (label). Figure references are defined using syntax identical to link references.
NOTE: As of this writing, Markdown has no syntax for specifying the dimensions of an figure; if this is important to you, you can simply use regular HTML <img> tags.
6.3 Figure captions
Markdown does not support figure captions. Please use HTML syntax to overcome the issue.
Syntax:
<figure>
  <img src="https://upload.wikimedia.org/wikipedia/commons/thumb/8/83/Classical_Guitar_labelled_english.jpg/1024px-Classical_Guitar_labelled_english.jpg" alt="" style="width:70%">
  <figcaption>This is figure caption.</figcaption>
</figure>
Result:
Syntax:
<figure>
<center>
  <img src="https://upload.wikimedia.org/wikipedia/commons/thumb/8/83/Classical_Guitar_labelled_english.jpg/1024px-Classical_Guitar_labelled_english.jpg" alt="" style="width:70%">
  <figcaption>This is figure caption.</figcaption>
</center>
</figure>
Result:
7. Tables
7.1 Basic table format
The basic table is left alignment.
Syntax:
|  Column name  |  Column name  |  Column name  |
|  -----------  |  -----------  |  -----------  |
|  Data         |  Data         |  Data         |
|  Data         |  Data         |  Data         |
Result:
| Column name | Column name | Column name |
|---|---|---|
| Data | Data | Data |
| Data | Data | Data |
7.2 Alignment
The alignment can be adjusted by :.
Syntax:
|  Column name  |  Column name  |  Column name  |
|  :----------  |  ----------:  |  :---------:  |
|  Data         |  Data         |  Data         |
|  Data         |  Data         |  Data         |
Result:
| Column name | Column name | Column name |
|---|---|---|
| Data | Data | Data |
| Data | Data | Data |
8. Separation lines (horizontal rules)
The separation lines (or horizontal rules) can be built by three *, -, or _. Spaces can be inserted into the symbols.
***

* * *

*****

---

- - -

-----

___

_ _ _

_____
Result:
The random using of *, -, and _ *-_, cannot built the separation line.
Syntax:
*-_
Result:
*-_
9. Footnotes
The footnote function is very similar to reference function in LaTeX. It can be treated as reference function in blog.
Syntax:
Footnote demo 1 [^1].
Footnote demo 1[^1].
Footnote demo 1.[^1]

[^1]: This is footnote 1.

Footnote demo 2.[^footnote_name]
Footnote demo 3.[^FOOT_label]

[^footnote_name]: This is footnote 2.
[^FOOT_label]: This is footnote 3.
Result:
Footnote demo 1 1.
Footnote demo 11.
Footnote demo 1.1
Footnote demo 2.2
Footnote demo 3.3
NOTE: The footnotes will be put at the end of the post.
Comment: The footnote function is very similar to the reference function in $LaTeX$. It can be treated as a reference function in the blog.
10. Hiding content with comments
To hide content from the rendered Markdown by placing the content in an HTML comment.
10.1 Single-line comments
Syntax:
<!-- This content will not appear in the rendered Markdown. -->
Result:
That’s right! You won’t see the result, since it is hidden.
10.2 Multi-line comments
Syntax:
<!--
This content will not appear in the rendered Markdown.
This content will not appear in the rendered Markdown.
This content will not appear in the rendered Markdown.
-->
Result:
That’s right! You won’t see the result, since it is hidden.
11. Backslash escapes
Markdown provides backslash escapes (\) for the following characters:
\   backslash
`   backtick
*   asterisk
_   underscore
{}  curly braces
[]  square brackets
()  parentheses
#   hash mark
+   plus sign
-   minus sign (hyphen)
.   dot
!   exclamation mark
12. Emoji
There are two ways to add emoji to Markdown files:
- Copy and paste the emoji into your Markdown-formatted text.
- Use emoji shortcodes.
12.1 Copy and paste emoji
In most cases, you can simply copy an emoji from a source (e.g., Emojipedia) and paste it into your document.
Many Markdown applications will automatically display the emoji in the Markdown-formatted text.
The HTML and PDF files exported from the Markdown application should display the emoji normally.
NOTE: If you’re using a static site generator (such as GitHub Pages), make sure you encode HTML pages as UTF-8.
12.2 Use emoji shortcodes
Some Markdown applications allow you to insert emoji by typing emoji shortcodes. These begin and end with a colon (:) and include the name of an emoji.
Syntax:
Hello World! :joy:
Result:
Hello World! 😂
13. $LaTeX$ syntax supported by MathJax
To display equations written by $LaTeX$ syntax, MathJax is required.
MathJaxis an open-source JavaScript display engine for $LaTeX$, MathML, and AsciiMath notation that works in all modern browsers.GitHub: MathJax (Source Repository)
https://github.com/mathjax/MathJax-src
See http://www.mathjax.org/ for additional details about MathJax, and https://docs.mathjax.org for the MathJax documentation.
Suggested Jekyll plugin of MathJax:
jekyll-spaceship: https://github.com/jeffreytse/jekyll-spaceship
NOTE: This plugin can be used in local site. However, for GitHub Pages, a build warning appears.
Warning message: “The github-pages gem can’t satisfy your Gemfile’s dependencies.”
13.1 Inline-style equations
Syntax:
This sentence uses `$` delimiters to show $LaTeX$ math inline: $\sqrt{3x-1}+(1+x)^2$
Result:
This sentence uses $ delimiters to show $LaTeX$ math inline: $\sqrt{3x-1}+(1+x)^2$
Syntax:
This is an equation,
${f(x)=a_nx^n+a_{n-1}x^{n-1}+a_{n-2}x^{n-2}}+\cdots$,
where there is no label (tag).
Result:
This is an equation,
${f(x)=a_nx^n+a_{n-1}x^{n-1}+a_{n-2}x^{n-2}}+\cdots$,
where there is no tag (label).
13.2 Display-style equations
This is an equation with tag (label).
For narmal display, the $LaTeX$ equation is enclosed by $$.
Syntax:
$$
{f(x)=a_nx^n+a_{n-1}x^{n-1}+a_{n-2}x^{n-2}}+\cdots \tag{1.1}
$$
Result:
\({f(x)=a_nx^n+a_{n-1}x^{n-1}+a_{n-2}x^{n-2}}+\cdots \tag{1.1}\)
This is an equation with tag (label).
For narmal display, the $LaTeX$ equation environment doesn’t need the $$ enclosure.
\begin{equation}
(a+b) \times c = a\times c + b \times c \\
\end{equation}

\begin{equation}
(a+b) \times c = a\times c + b \times c \\
\tag{1.1}
\end{equation}
Result:
\begin{equation}
(a+b) \times c = a\times c + b \times c
\end{equation}
\begin{equation}
(a+b) \times c = a\times c + b \times c
\tag{1.1}
\end{equation}
This is the famous Maxwell’s equations.
For narmal display, the $LaTeX$ align environment is enclosed by $$, and a space should be added after \\.
Syntax:
$$
\begin{align}
\nabla \cdot  \mathbf{E} &=  \frac{\rho}{\varepsilon_0} \\
\nabla \cdot  \mathbf{B} &=  0 \\
\nabla \times \mathbf{E} &= -\frac{\partial \mathbf{B}}{\partial t} \\
\nabla \times \mathbf{B} &=  \mu_0 \left( \mathbf{J} + \varepsilon_0 \frac{\partial \mathbf{E}}{\partial t} \right)
\tag{1.1}
\end{align}
$$
Result: \(\begin{align} \nabla \cdot \mathbf{E} &= \frac{\rho}{\varepsilon_0} \\ \nabla \cdot \mathbf{B} &= 0 \\ \nabla \times \mathbf{E} &= -\frac{\partial \mathbf{B}}{\partial t} \\ \nabla \times \mathbf{B} &= \mu_0 \left( \mathbf{J} + \varepsilon_0 \frac{\partial \mathbf{E}}{\partial t} \right) \tag{1.1} \end{align}\)
13.3 Issue discussion
LaTeX math expressions can be rendered natively in Markdown on GitHub.
REF: https://github.blog/2022-05-19-math-support-in-markdown/
However, in other platform (such as Minimal Mistakes Jekyll theme), we still require MathJax.
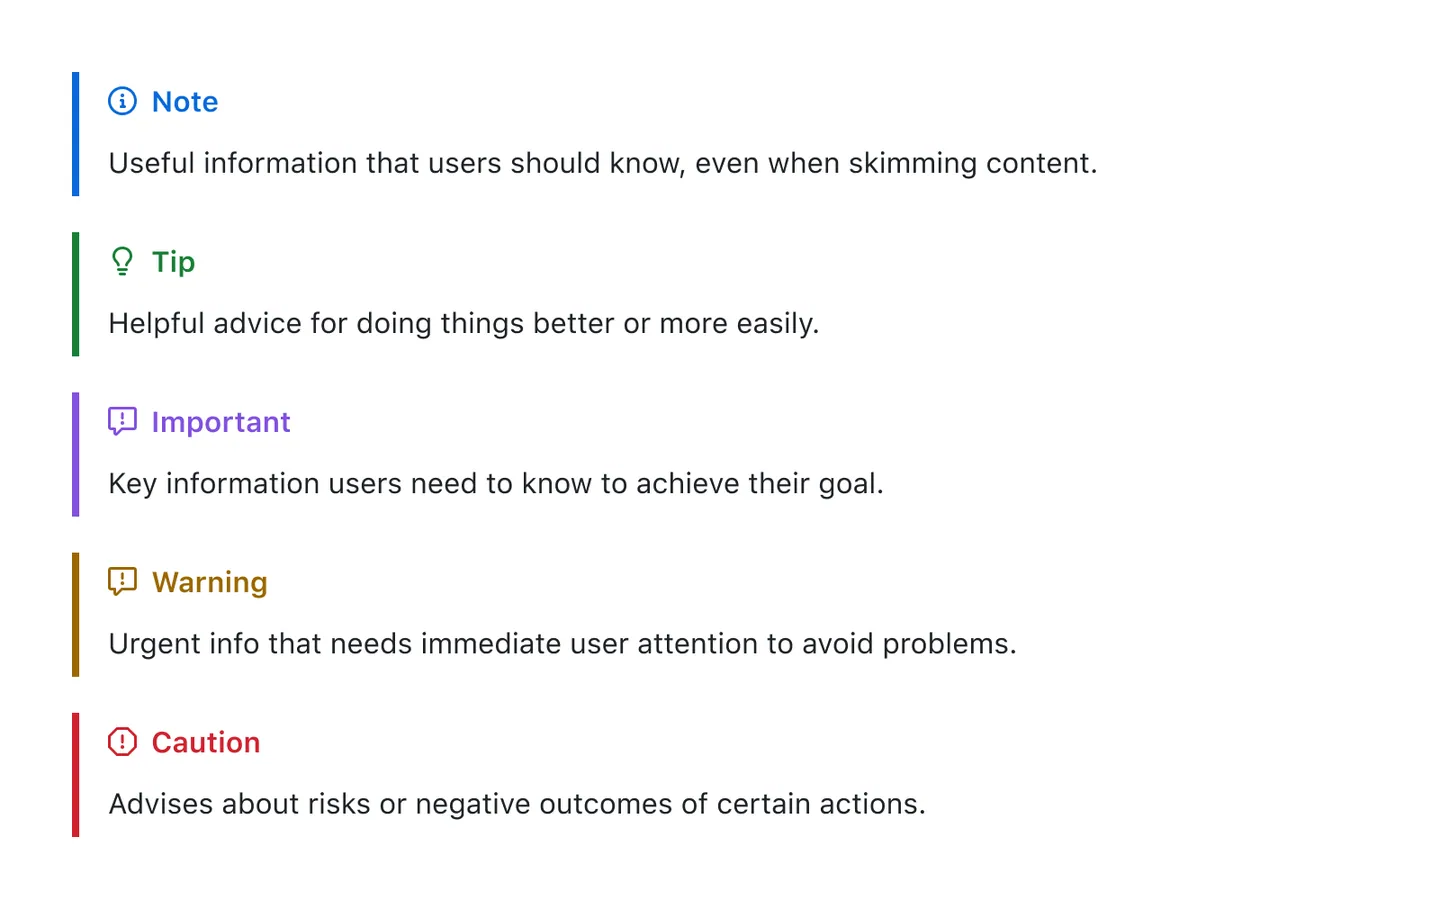
14. Alerts (GitHub feature)
Alerts are a Markdown extension based on the blockquote syntax that you can use to emphasize critical information. On GitHub, they are displayed with distinctive colors and icons to indicate the significance of the content.
There are 5 level alerts. Syntax:
[!NOTE] Useful information that users should know, even when skimming content.
[!TIP] Helpful advice for doing things better or more easily.
[!IMPORTANT] Key information users need to know to achieve their goal.
[!WARNING] Urgent info that needs immediate user attention to avoid problems.
[!CAUTION] Advises about risks or negative outcomes of certain actions.
Here are the example figure for the rendered alerts:
About Markdown
Markdown logo:

Markdown is a lightweight markup language for creating formatted text using a plain-text editor. John Gruber and Aaron Swartz created Markdown in 2004 as a markup language that is intended to be easy to read in its source code form. Markdown is widely used for blogging and instant messaging, and also used elsewhere in online forums, collaborative software, documentation pages, and readme files.
Wikipedia: Markdown
https://en.wikipedia.org/wiki/Markdown
Markdown is intended to be as easy-to-read and easy-to-write as is feasible.
John Gruber
Markdown syntax - The Daring Fireball Company LLC.
https://daringfireball.net/projects/markdown/syntax
Leave a comment